

Gift Tag Tutorial
Equipment:
Ranger Gift Tags Kraft - available here
Echo Park Very Merry Christmas - here
Martha Stewart border punch
Adhesive Pearls
Tim Holtz Rosette Die
Big Shot
Big Bite
Grommets
Ribbon remnants
Imaginisce Brad/Button Maker
Off cuts christmas material
Double sided tape
Glue gun
Scissors
Trimmer
Step 1:
Cover your ranger gift tag in double sided tape and cover in your chosen paper.
.JPG)
.JPG)
.JPG)
.JPG)
Step 2:
Using your scissors (or trimmer) if you prefer cut around your tag.
.JPG)
.JPG)
Step 3:
Choose a contrasting paper from the paper pack, I used the large ornaments paper. With the border punch punch along the paper so that it will fit across your tag. Trim the paper to the desired height and repeat on the opposite side.
.JPG)
.JPG)
Step 4:
Stick onto your gift tag and trim off the excess at the edges.
.JPG)
.JPG)
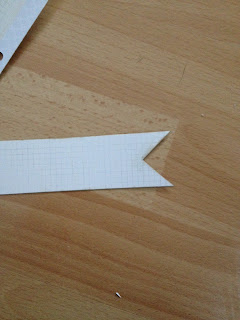
Step 5:
Using a cream paper trim a fish tail at one end and cut to your desired length. Attach onto your tag so that it just covers the red punched border.

Step 5:
Using the big shot and rosette die, cut out your die. Using the larger one make up using your glue gun. Attach onto the tag along with a greeting sticker from the sticker sheet within the Very Merry
collection pack and some adhesive pearls.
.JPG)
.JPG)
Step 6:
Using the big bite, punch a hole into the top of your tag, if you turn your tag over you can use the one already punched as a guide. Then set a grommet into the hole to protect it from ripping once on the present.
.JPG)
.JPG)
Step 7:
Using the imaginisce brad maker, cut out the pictures you want from the off cut of material and make up following the instructions into brads. Make sure the material is all tucked in neatly at the back before setting the brad legs.
.JPG)
Step 8:
Set the brad onto the middle of the rosette and put your chosen ribbons through the grommet to hang onto your present.
Step 9:
Wrap your present, write your tag and attach.


0 comments:
Post a Comment